3D botanical crafts
How to Make Botanical Perler Bead Plants: Pothos, Ivy & 3D Vines
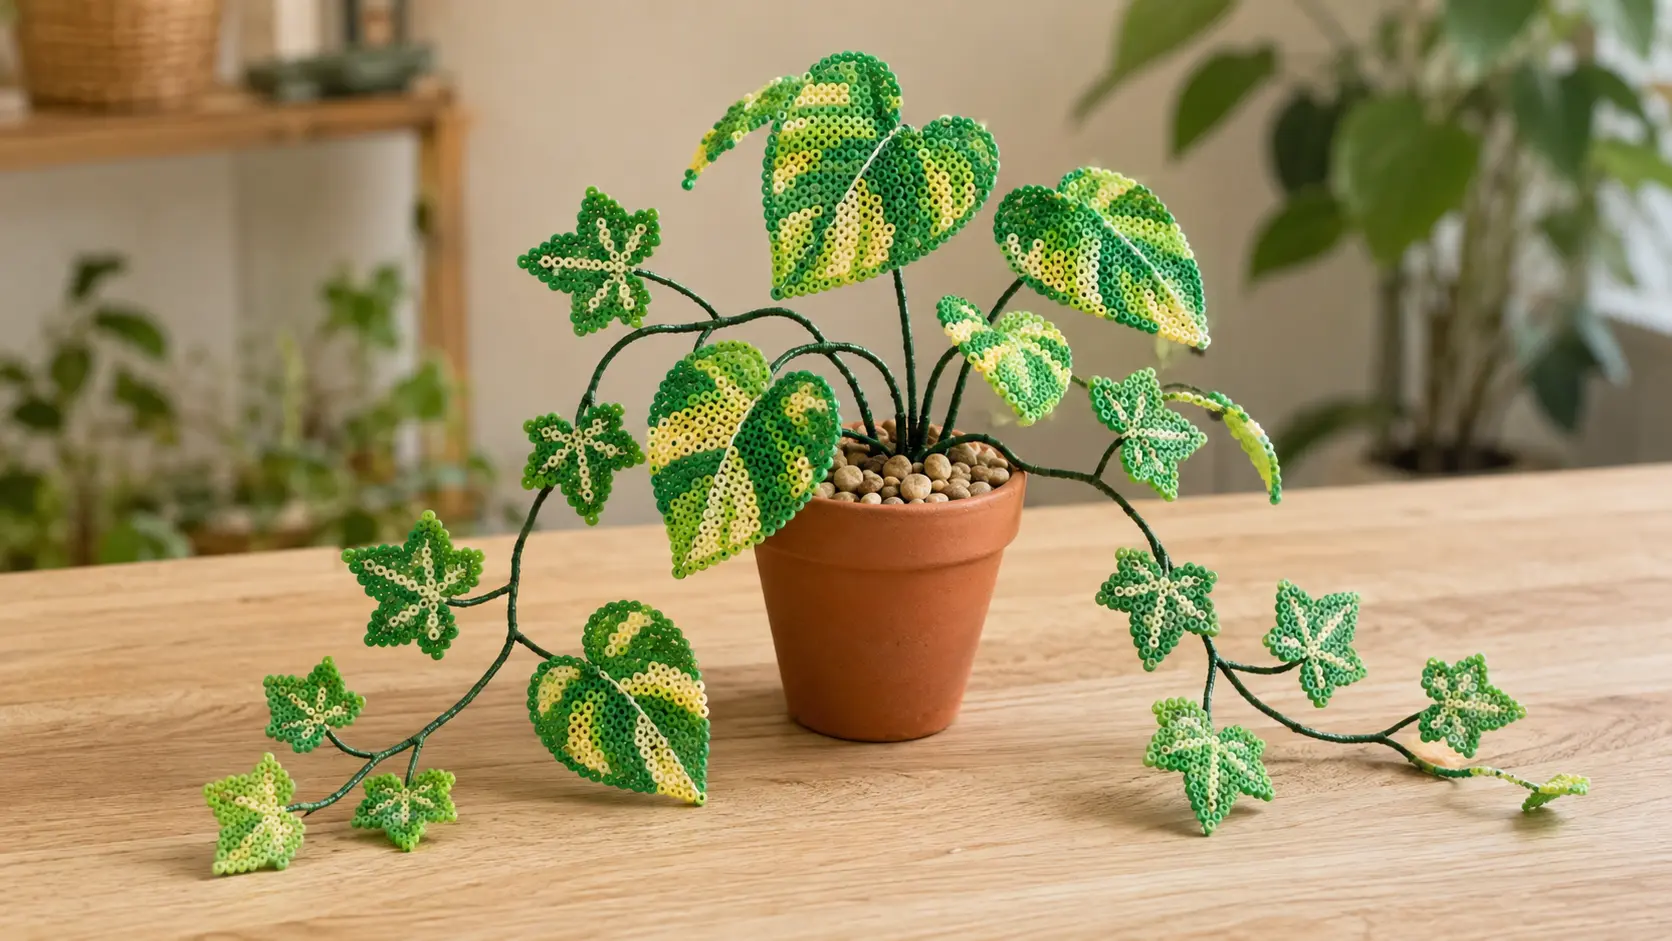
A botanical Perler bead plant looks convincing when you build it like a plant—not like one flat pixel-art panel. Make each leaf separately, preserve attachment holes, lightly fuse both sides, shape the warm leaf around its real midrib, then mount leaves at natural nodes along wired stems.
This complete tutorial uses a heart-shaped golden pothos and a smaller lobed English ivy, but the same method works for philodendron, eucalyptus, monstera, and original fantasy plants. You will get exact leaf-size ranges, practical ironing windows, shaping forms, stem gauges, pot assembly, and fixes for leaves that crack, flatten, spin, or droop.
The realistic-leaf formula
Recognizable silhouette + controlled color variation + flexible two-sided fuse + species-specific curve + alternating wired nodes. If one of those five parts is missing, the plant tends to read as a flat sprite attached to a stick.
What You Are Making
The finished project is a dry indoor sculpture in a real pot. The pot, foam, wire, tape, and pebbles are conventional floral-craft materials; the leaf blades are individual fuse-bead pieces. Pothos supplies the broad focal leaves, while ivy fills the lower canopy and creates long trailing movement.
The leaf shapes are based on real plants. Juvenile pothos—the form most people grow indoors—has glossy, smooth-edged, heart-shaped leaves. Penn State Extension also notes the inward fold along the midrib, which is the most useful three-dimensional detail to copy. Juvenile English ivy has simple leaves with three to five lobes, pale veins, and an alternate arrangement along its stems. Those differences should remain obvious even before you add color.
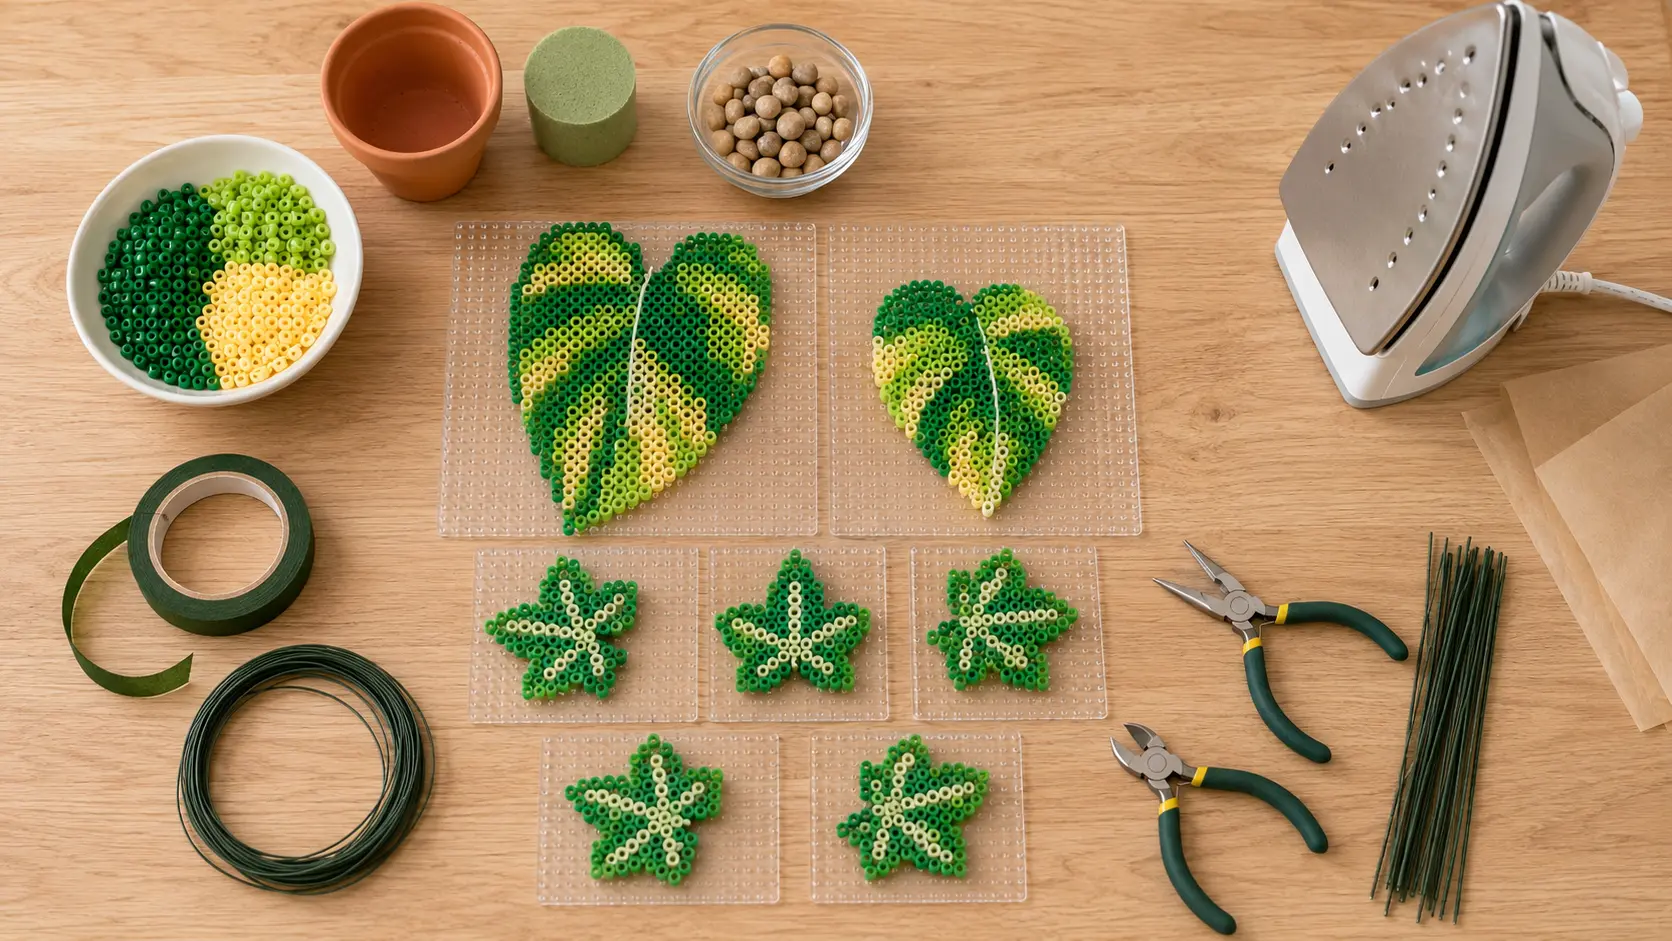
Materials and Tools
- Classic 5 mm fuse beads: three or four greens, plus cream, yellow, or pale green for variegation and veins.
- Clear interlocking pegboards: one 29×29 board handles most leaves; connect boards for statement pothos or monstera leaves.
- Ironing paper and a dry household iron: steam off; use a hard, heat-safe work surface.
- Stem wire: 18–20 gauge for upright stems, 20–22 gauge for trailing vines, and 24–26 gauge for short branchlets or leaf ties.
- Green floral tape: paper-covered wire can be used underneath, but tape makes joints and color consistent.
- Needle-nose pliers and flush cutters: for safe, controlled loops and trimmed wire ends.
- Smooth shaping forms: a 12–20 mm dowel for pothos folds and a shallow spoon rest or small bowl for ivy cups.
- A real dry pot: terracotta, ceramic, metal, or a clean nursery pot inside a decorative cover.
- Dry pot insert and top dressing: floral foam, cork, or dense packing foam plus pebbles, preserved moss, or glass stones.
- Optional reinforcement: a low-temperature glue gun used sparingly on hidden backs by an adult.
Heat and wire safety
An adult should handle the iron, hot plastic, cutters, and glue gun. Switch steam off, never iron bare beads or a plastic pegboard directly, let a leaf cool from hot to safely warm before touching it, turn every cut wire end inward with pliers, and keep foam, pebbles, beads, and wire away from young children and pets.
Choose Leaf Sizes That Fit the Pot
Classic beads sit about 5 mm apart on the pegboard, so every two bead positions equal roughly one centimeter. A 17-bead pothos leaf is therefore about 8.5 cm long before minor fusing shrinkage. Start with the pot, not the largest board you own: the broadest leaf should normally be no wider than the pot opening and no longer than about one-third to one-half of the visible arrangement height.
| Plant style | Leaf grid for 5 mm beads | Approx. leaf size | Natural shaping target |
|---|---|---|---|
| Golden pothos | 11–19 beads long × 9–17 wide | 5.5–9.5 cm long | Soft heart fold along the midrib; tip slightly down |
| English ivy | 7–11 beads wide and tall | 3.5–5.5 cm across | Very shallow cup; individual lobes at slightly different heights |
| Heartleaf philodendron | 13–21 long × 11–19 wide | 6.5–10.5 cm long | Deeper V than pothos; long point bends gently down |
| Eucalyptus sprig | 7–11 round or oval | 3.5–5.5 cm long | Mostly flat with a small side tilt at the stem |
| Young monstera | 21–29 long × 19–27 wide | 10.5–14.5 cm long | Broad shallow wave; use cut-in edges only at smaller grids |
Make at least three sizes. A believable six-leaf pothos might use one 19-bead leaf, two 15-bead leaves, two 13-bead leaves, and one 9-bead tip leaf. A trailing ivy stem can decrease from 11 beads to 9, 8, and 7 beads toward the growing tip. Rotate and mirror the patterns so the perimeter is not repeated exactly.
Design Pothos and Ivy Leaves That Read Clearly
Pothos: protect the heart, midrib, and pointed tip
Begin with a broad heart rather than a round blob. Cut a notch two or three beads deep at the top, keep a continuous one- or two-bead-wide midrib path, and taper the lower third into a point. The midrib must remain connected; do not split the leaf into two halves just to make it easier to fold.
For golden pothos, use a dark-green outline sparingly, medium green as the main field, lime or bright green for fresh growth, and cream or yellow for irregular variegation. Let one light patch cross the midrib, keep another near an edge, and leave some leaves almost solid green. Natural variation is clustered, not evenly sprinkled.
English ivy: silhouette before vein color
Use three or five visible lobes with the center lobe longest. Leave only one-bead-wide necks where a lobe joins the center if your test fuse is strong enough; beginners should use two beads at high-stress joins. Run a pale green or gray-green vein from the base into each lobe. Pure white can overpower a small leaf, so reserve it for highly variegated cultivars.
Ivy leaves sit alternately rather than in matched pairs. When you assemble the vine, change the side of the stem at each node and rotate the leaf face slightly toward the imaginary light source. This small rule adds more realism than adding another shade of green.
Turn a real leaf photo into a starting grid
Photograph one healthy leaf straight-on against a plain contrasting background, then crop tightly and convert it in BeadForge. Choose a grid close to the size ranges above, limit the palette to the greens you own, remove stray background beads, and manually strengthen narrow lobes or the attachment base.
Step-by-Step: Make the Leaves, Stems, and Pot
- Sketch the whole plant first. Decide the pot size, number of stems, longest trail, focal leaf, and direction of the imaginary window light.
- Create a leaf family. Make one master pothos or ivy grid, then produce smaller, mirrored, and differently variegated versions.
- Protect the attachment base. Leave two center holes open near the base and build at least a two-bead-wide area around them so fine tie wire cannot tear through an edge.
- Place all beads and inspect from a distance. Check silhouette, color islands, weak one-bead bridges, and whether the light vein reaches the correct base.
- Fuse a scrap calibration leaf. Use the same bead colors, paper, iron, and narrow lobe construction as the final project.
- Lightly fuse both sides. Keep the dry medium iron moving, inspect early, and add short passes only where bead edges have not joined.
- Shape while safely warm. Support the full leaf, make the plant-specific curve, and leave it untouched on the form until fully cool.
- Prepare the stems. Cut wire longer than the final plant, fold or round the top end, and wrap exposed wire in stretched floral tape.
- Attach leaves at nodes. Use fine wire through the preserved holes, bind it to the main stem, turn the cut end inward, and tape over the whole joint.
- Test the composition before anchoring. Bend stems into loose arcs, hold the bundle above the pot, and move crowded leaves rather than forcing every piece into the foam.
- Set stems into the dry insert. Place taller stems near the center, trailing stems near the rim, and spread the insertion points so the foam does not split.
- Finish the pot. Cover the foam with a thin stable layer of pebbles or preserved moss, then make final bends below the leaf joints rather than repeatedly flexing the plastic.
Ironing Times for Realistic Botanical Leaves
Perler's standard method calls for a medium dry iron, circular movement, and about 10–20 seconds of heat per side. That is a baseline, not an exact recipe: iron thermostats cycle, some colors fuse sooner, and a narrow ivy lobe heats faster than the center of a large pothos leaf. Inspect at the first-check time below and continue in three-to-five-second moving passes only where needed.
| Leaf | First inspection | Typical working window per side | Stop cue for shaping |
|---|---|---|---|
| Small ivy, 7–9 beads | 8–10 seconds | About 10–14 seconds | Every lobe is joined; holes remain clearly open |
| Medium ivy, 10–13 beads | 10 seconds | About 10–16 seconds | Narrow valleys hold together under a gentle supported lift |
| Pothos, 11–15 beads long | 10 seconds | About 10–16 seconds | Edges join; leaf flexes as one piece; most holes stay open |
| Large pothos or philodendron, 16–23 beads | 10 seconds | About 12–20 seconds | Center and perimeter have an even bond without a flat full melt |
| Large monstera, 24–29 beads | 10 seconds | About 15–20 seconds plus local edge passes | Cut-in edges are stable and the broad center remains flexible |
These are starting windows for classic 5 mm beads, not guarantees. Stop sooner if holes close quickly, colors become glassy, or the pattern spreads. Add heat if outer beads move independently when you lift the paper. Do not compensate for low heat by pressing hard; pressure can flatten one area before another area bonds.
Choose a flexible fuse, not an under-fuse
A shapeable leaf still needs real fused bridges on both faces. “Lightly fused” means joined with visible holes, not barely stuck together on one side. Fuse the display face first, let it stabilize just enough to flip safely, fuse the back, and perform the shaping after the second side when the leaf has cooled from hot to safely warm.
How to Shape Each Leaf While Warm
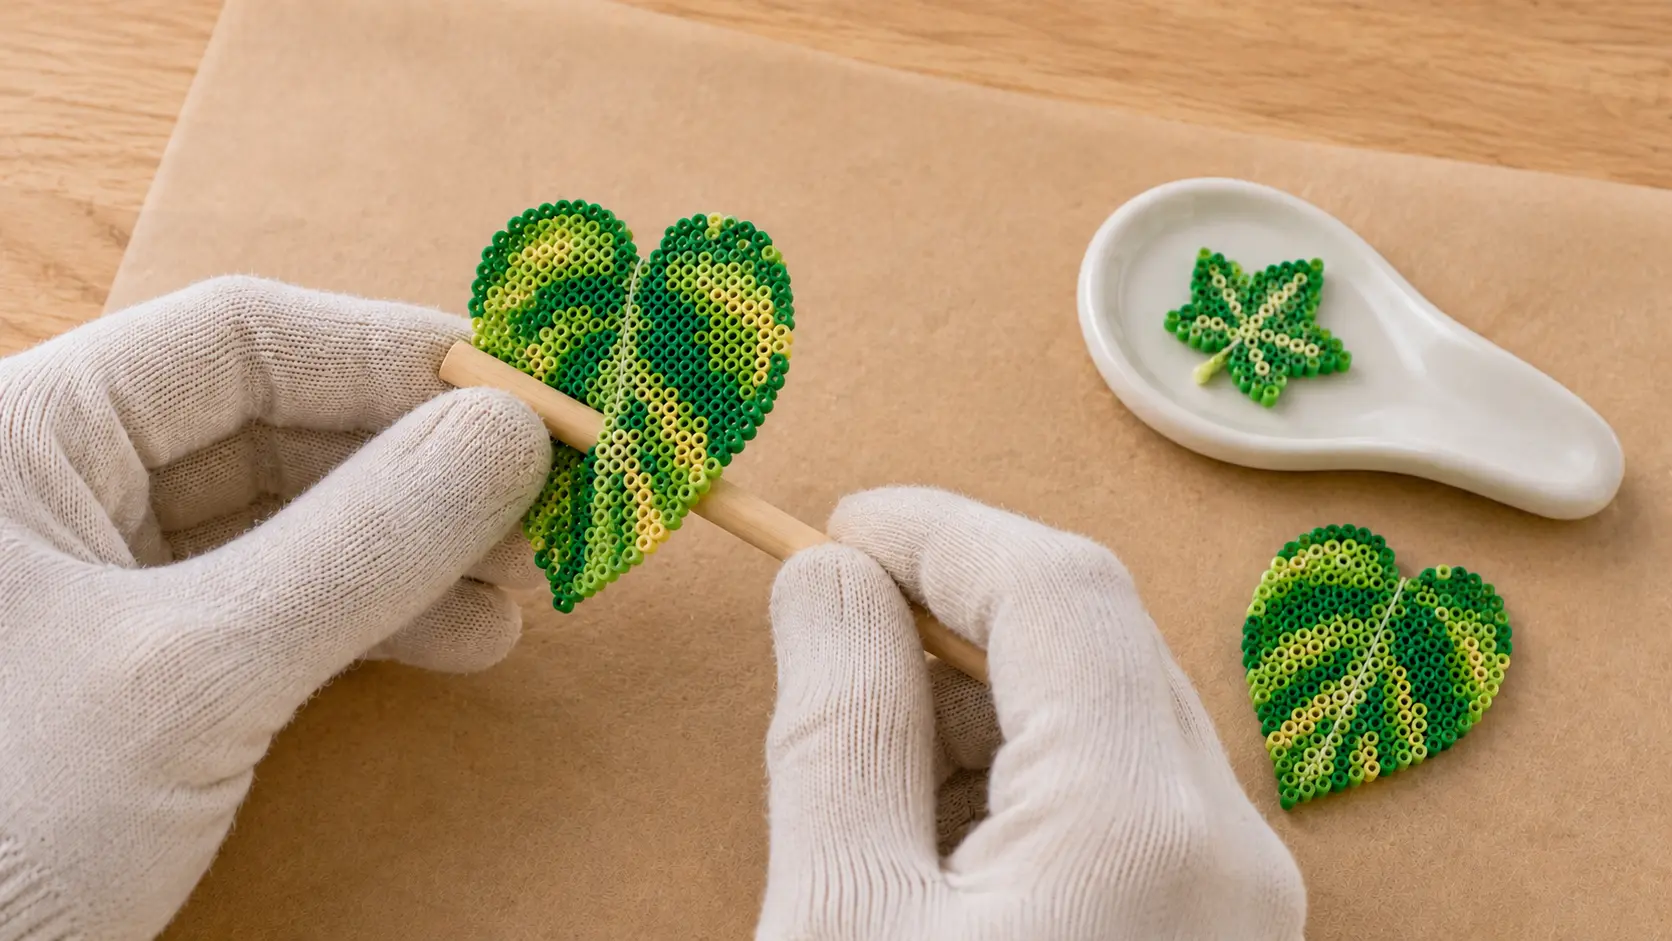
Use gradual curves and full-surface support. Never pinch one bead row into a sharp crease. If the leaf has become rigid before you are ready, return it under clean ironing paper for a very short moving pass, let it settle to safely warm, and try again once. Repeated heat cycles weaken detail and make results less predictable.
| Plant | Form | Curve | Hold until cool |
|---|---|---|---|
| Pothos | 12–20 mm smooth dowel under the midrib | Gentle 15–30° lengthwise fold; tip 5–10° downward | Usually 45–90 seconds |
| English ivy | Shallow spoon rest or bowl edge | 5–15° cup; offset one or two lobes with fingertip support | Usually 30–60 seconds |
| Philodendron | Narrow dowel under the midrib | 20–35° V with a relaxed downward point | Usually 45–90 seconds |
| Eucalyptus | Mostly flat board plus a small side prop | Near-flat blade; 5–10° turn at the petiole | Usually 30–45 seconds |
| Monstera | Wide bottle or bowl exterior | Broad 5–15° wave, never a tight center crease | Usually 60–120 seconds |
Build Stems That Hold Their Pose
Wire gauge controls both movement and visual weight. Use 18–20 gauge for upright focal stems carrying several large pothos leaves, 20–22 gauge for hanging pothos and long ivy vines, and 24–26 gauge only for short branches or ties. If one long trail slowly straightens, twist two matching stem wires together before taping rather than trying to stiffen the leaf itself.
Cut stems 5–8 cm longer than the visible length so they can enter the pot insert securely. Make broad arcs, not repeated little zigzags. Place pothos nodes roughly 5–8 cm apart and ivy nodes about 3–5 cm apart, decreasing both spacing and leaf size near each tip.
Best leaf attachment: wire, then tape
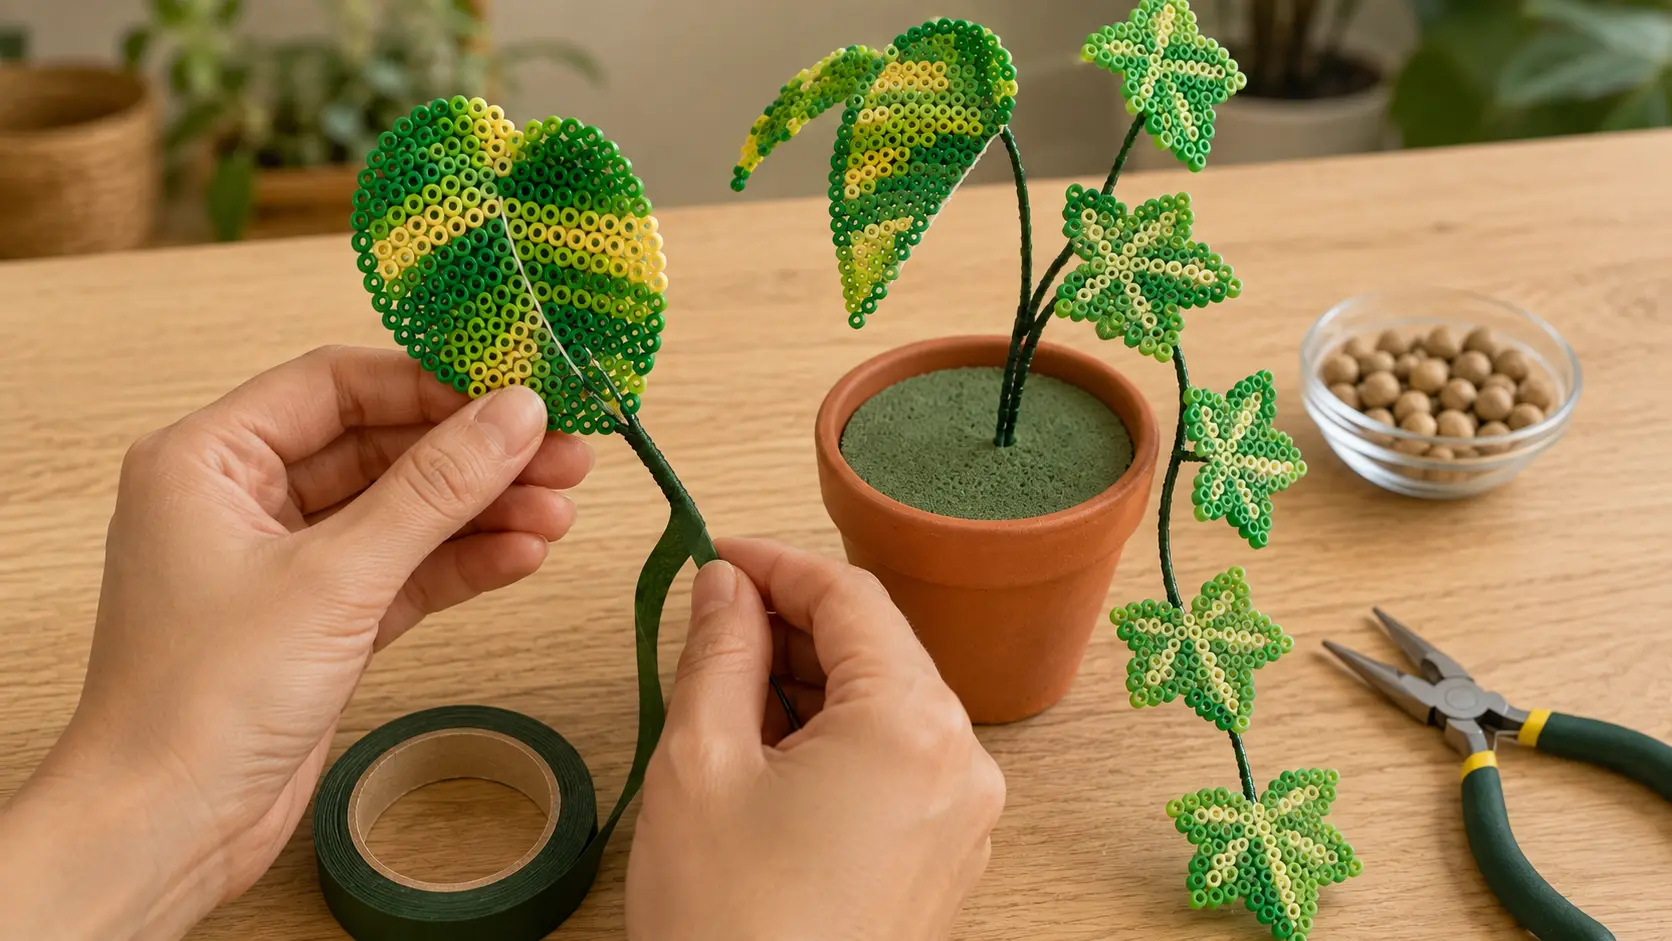
- Thread a short 24–26 gauge green tie through two open holes at the leaf base.
- Lay the leaf base against the main stem with the display face aimed toward the light.
- Wrap the tie around the stem twice without crushing a bead hole.
- Trim the tie, turn its end inward with pliers, and cover the entire joint with stretched floral tape.
- Test the leaf gently. It should hold its angle but still be replaceable if the pattern is damaged.
Hot glue is optional reinforcement, not the main structure. If a heavy leaf rotates, add a tiny dot on the hidden back after the mechanical tie is complete. Large exposed glue mounds look artificial, attract dust, and make repairs difficult.
Arrange the Plant in a Real Pot
Cut the dry foam or cork so it fits tightly without stressing the pot. A shallow insert can tip under a long vine, so use enough depth to resist leverage. If the pot is light, add clean stones below the foam for ballast, then secure the insert so it cannot rotate.
- Start with the tallest focal stem: place it slightly off-center instead of making a symmetrical fan.
- Add the longest trail second: let it cross the rim naturally, with its last two leaves smaller.
- Fill negative space: use short ivy branches and one or two young pothos leaves, not another giant focal leaf.
- Turn faces toward one light source: vary the exact angle, but avoid showing every leaf edge-on.
- Leave air between leaves: overlap a few, then preserve visible gaps so the silhouettes remain readable.
- Cover the mechanics: add only enough pebbles or preserved moss to hide the insert without burying low leaves.
Keep this sculpture separate from wet potting soil and live-plant watering. A real decorative pot is ideal; a real growing environment is not. Moisture can swell foam, stain tape, rust cut wire ends, and trap dirt in the bead holes.
Five Botanical Recipes to Try
| Plant | Palette | Stem plan | Signature detail |
|---|---|---|---|
| Golden pothos | Dark green, green, lime, cream/yellow | 2 upright + 2 trailing stems; 6–10 leaves | Irregular variegation crossing a folded midrib |
| Marble queen pothos | Green, sage, cream, white used sparingly | 3 loose trails; 7–12 leaves | Cream fields broken by green islands; no two leaves alike |
| English ivy | Forest green, medium green, gray-green vein | 2–4 long alternating vines; 10–18 leaves | Three-to-five lobes with pale radiating veins |
| Heartleaf philodendron | Deep green, emerald, fresh-leaf lime | 2 climbing + 1 trailing stem; 6–9 leaves | Deeper heart notch, longer tip, stronger V fold |
| Eucalyptus | Blue-green, sage, dusty teal | 3 upright branching stems; 12–24 leaves | Nearly round leaves, spaced pairs visually offset along thin stems |
Troubleshooting
The leaf cracks when you bend it
It was under-fused, completely cold, bent across a weak one-bead bridge, or forced into a tight crease. Strengthen narrow pattern connections, fuse both faces, wait for safely warm flexibility, and use a wider form. Do not pull the two sides of a pothos leaf apart at the heart notch.
The leaf became flat, glossy, and impossible to shape
The fuse moved too far toward a full melt. Lower the iron one step, inspect earlier, keep it moving, and use the visual bond cue. You cannot restore closed holes, so turn the damaged leaf into a pot label or test piece and remake the botanical leaf with less heat.
Ivy tips keep separating
One-bead-wide lobe connections are delicate. Widen each valley with one support bead, give perimeter lobes an intentional short extra pass, and lift the fused piece with the paper supporting every tip. Large chunky ivy often looks more natural than a fragile mathematically sharp star.
Leaves spin around the stem
Use two attachment holes rather than one, bind the tie to the stem twice, and stretch floral tape as you wrap so it grips itself. If a heavy pothos leaf still rotates, add a tiny hidden low-temperature glue dot after the wire joint is correct.
The whole plant looks stiff or artificial
Reduce symmetry. Mix at least three leaf sizes, mirror a few patterns, alternate ivy nodes, cluster variegation instead of making dots, curve stems in broad arcs, and aim leaf faces toward one imaginary window. Remove one crowded leaf before adding more detail.
The arrangement tips over
Shorten the longest unsupported trail, use stronger or doubled stem wire, deepen the insert, and add ballast below the foam. Keep the heavy focal leaves closer to the pot's center and let small ivy leaves create the farthest horizontal reach.
Do a one-leaf prototype
Before building a full vine, make one medium leaf using the exact beads, narrowest bridge, paper, temperature, wire tie, and shaping form you plan to use. Record the iron setting, first-check time, total moving time per side, wait before shaping, and hold-to-cool time. That sample becomes your recipe for the whole plant.
Upload a clear leaf photo to BeadForge, choose your real bead brand and grid size, limit the colors to your stash, clean the silhouette, and export the exact bead count and printable board plan free in your browser.
Make a botanical bead pattern from your own leaf photo →Related BeadForge Guides and Sources
For the full heat calibration process, use the Perler Bead Iron Temperature & Settings Guide. For flat-project repairs and cooling control, read How to Iron Perler Beads Without Warping. To plan oversized leaves across boards, see Perler Bead Board Sizes.
The heat baseline follows Perler's standard fusing method. Botanical proportions and leaf architecture were checked against the University of Wisconsin's pothos profile, Penn State Extension's houseplant description, and the University of Maryland Extension and NC State resources for English ivy form and leaf size.
Frequently asked questions
Can you bend Perler bead leaves after ironing?
Yes. Lightly fuse both sides, wait only until the leaf is warm rather than dangerously hot, then support the whole piece while shaping it over a smooth dowel, spoon rest, or other shallow form. Hold it still until fully cool. A standard fuse with visible bead holes bends more cleanly than a brittle full melt.
How long should I iron Perler bead plant leaves?
With classic 5 mm beads and a dry household iron on medium, inspect at 10 seconds and expect roughly 10–20 seconds per side. Small ivy tips may finish near the early end; large pothos leaves may need short extra passes at their edges. Stop by bond and flexibility, not the clock: neighboring beads should be joined while most center holes remain visible.
What size should Perler bead pothos and ivy leaves be?
For a small real pot, make pothos leaves 11–19 beads long (about 5.5–9.5 cm with 5 mm beads) and ivy leaves 7–11 beads wide (about 3.5–5.5 cm). Use at least three sizes and make the newest leaves smallest so the finished vine does not look stamped or repetitive.
How do you attach Perler bead leaves to floral wire?
Preserve two open bead holes at the leaf base. Pass fine green wire through those holes, wrap it around a stronger paper-covered stem, trim and turn the sharp end inward, then conceal the joint with stretched floral tape. This mechanical connection is more repairable than glue alone; a tiny low-temperature glue dot can be added on the hidden back if needed.
Can I put a Perler bead plant in a real flowerpot?
Yes. Use a clean dry pot as the decorative container, cut a snug dry floral-foam or cork insert, anchor each stem in it, and cover the insert with pebbles, preserved moss, or glass stones. Do not place the bead sculpture in wet soil or where a live plant will be watered.
How do I make variegated pothos leaves look natural?
Use three or four related greens plus one cream or yellow-green accent. Build two or three irregular color islands that cross the midrib, keep some leaves mostly green, and change the pattern on every leaf. Even dots, perfect stripes, and identical left-right markings make the vine look artificial.
Should botanical fuse-bead leaves be fully melted?
Usually no. A full melt can be strong but flat and less responsive to gentle shaping. For dimensional leaves, use a flexible standard fuse: bead edges are joined on both sides, most center holes remain open, and narrow lobes survive a cautious bend without separating.
Can a Perler bead plant stay outdoors?
Treat it as indoor decor. Direct sun and hot windows can soften or fade plastic, moisture can damage foam and wrapped wire, and wind can fatigue leaf joints. Display it indoors away from heaters, candles, pets, and places where children could reach exposed wire or small decorative stones.
Ready to make your own pattern?
BeadForge turns any image into a printable fuse bead pattern with bead counts and pegboard sizing — free, in your browser, no signup.