Fusing guide
How to Iron Perler Beads Without Warping
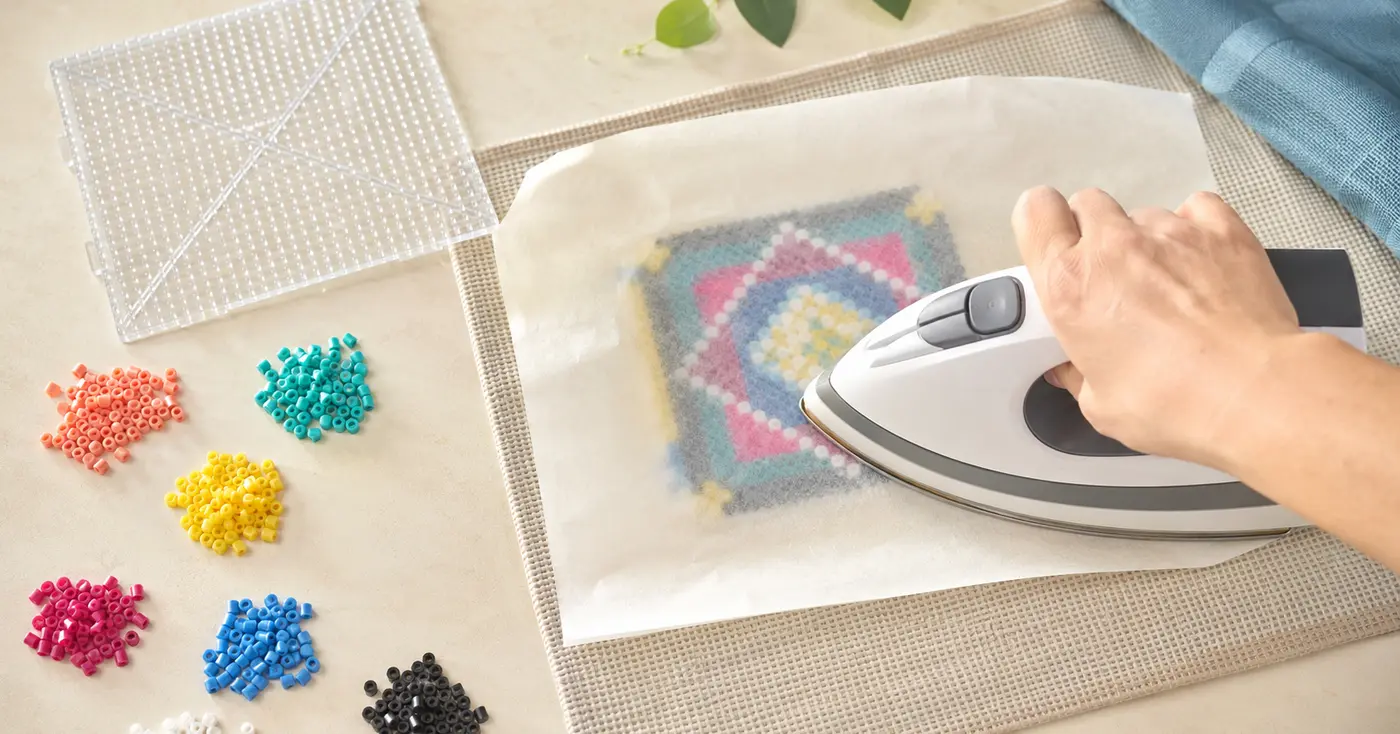
The safest route to a flat fuse bead project is controlled heat followed by controlled cooling: use a dry iron over proper ironing paper, keep the iron moving, stop as soon as the bead edges reach your chosen melt, then cool the finished piece completely under an even weight.
This guide answers the temperature, timing, paper, warping, repair, and large-project questions that appear again and again. “Perler” is used when discussing Perler’s published directions; general advice is labeled for fuse beads because settings can differ by brand, size, color, and iron.
The short answer
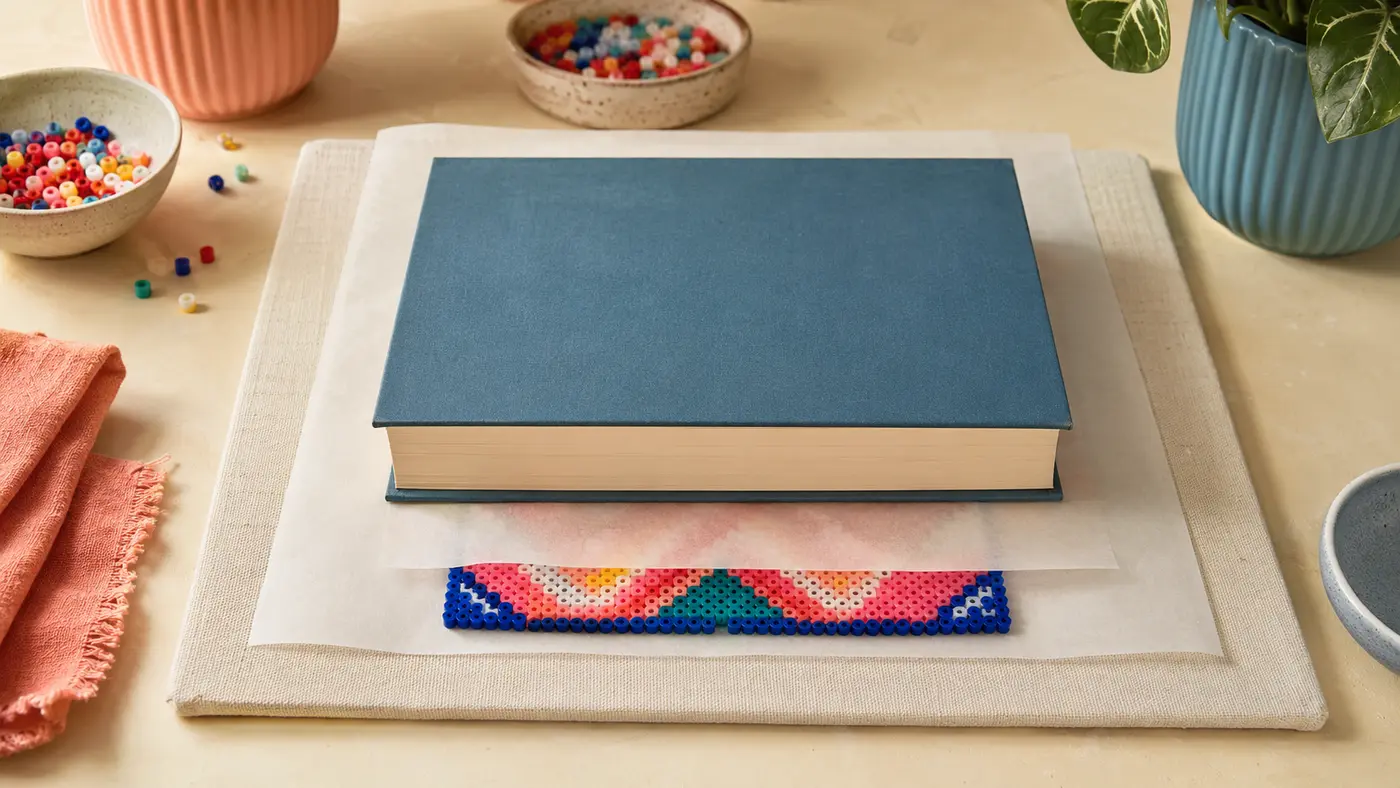
For classic 5 mm Perler beads, begin with a medium, dry iron with steam off. Cover the design with flat ironing paper, move the iron continuously in slow overlapping circles or passes, and inspect often. Fuse both sides for strength, then place the warm piece between clean paper under a heavy book until it is completely cool.
Perler bead iron temperature and time
There is no reliable universal Fahrenheit number. Perler recommends starting at medium because household irons cycle above and below their dial setting, soleplates distribute heat differently, and “medium” on one model may behave like “high” on another. Hama publishes fabric-dial settings by bead size, but it also recommends testing a small motif before an important project.
| Bead type | Starting iron setting | First check | What to watch |
|---|---|---|---|
| Perler Classic, 5 mm | Medium, dry iron; steam off | Use a short pass, then inspect. About 10–20 seconds per area is a practical checkpoint for many projects. | Edges join while center holes remain open for a standard fuse. |
| Hama Midi, 5 mm | Cotton setting in Hama’s guide | Check after a few seconds while keeping the iron moving. | Colors become clearer through the ironing paper. |
| Hama Mini | Wool setting in Hama’s guide | Check sooner than you would with 5 mm beads. | The smaller bead mass reacts quickly to concentrated heat. |
| Hama Maxi | Linen setting in Hama’s guide | Check the bond frequently. | Larger beads need a different setting than Mini or Midi. |
| Artkal, Nabbi, mixed or unknown beads | Follow the package; start conservatively | Test a small sample made from the same colors. | Brands, finishes, and pigments may soften at different rates. |
Perler’s official large-project instructions describe roughly 10–20 seconds of heat per side as a common fusing window, while warning that additional time may be needed. Treat that as a checkpoint, not a promise. The bond in front of you is a better stop signal than a timer.
Make a calibration patch first
Build a small 5×5 or 8×8 square using several colors from the real project. Record the iron setting, pass length, and result. That tiny test is cheaper than discovering that a new iron runs hot on a 10,000-bead portrait.
What you need before fusing
- A completed fuse bead design on a stable pegboard or secured with a suitable tape method.
- A dry household iron with steam switched off and the water reservoir empty when practical.
- Manufacturer ironing paper or heat-resistant baking parchment large enough to cover every bead.
- A hard, flat, heat-safe work surface that will not flex under the iron.
- Two clean cooling sheets so the warm plastic never contacts the book or work surface directly.
- A broad, flat weight such as a heavy hardcover book or a flat board with weight on top.
- An adult responsible for the iron. Both Perler and Hama place the hot-ironing step with adults.
A thick, springy ironing-board pad can make pressure less consistent. A hard surface protected by a heat-safe mat is easier to keep level. Check the work surface manufacturer’s heat limits before starting.
How to iron fuse beads step by step
- Check the design and flatten the paper. Verify missing or wrong beads before heat makes the pattern permanent. Smooth creases from the ironing sheet so it rests evenly across the bead tops.
- Preheat a dry iron at the conservative setting. For Perler Classic beads, start at medium with steam off. Give the thermostat time to stabilize, then test the setting on a small sample.
- Cover every bead. The soleplate must contact only the protective paper. Keep it away from bare pegboard plastic because excessive heat can bend or flatten the pegs.
- Move continuously with overlapping passes. Use slow circles or short back-and-forth passes, firm even pressure, and enough overlap that edges receive the same heat as the center. Do not park the iron in one spot or press hard enough to crush the cylinders.
- Read the melt through the sheet. As the bead tops soften, ironing paper becomes more transparent and the colors show through more clearly. Stop and inspect as soon as neighboring edges join at your intended melt level.
- Let the first side stabilize, then flip carefully. Do not rip the paper away while everything is soft. Let the piece cool briefly, peel slowly, and use a second flat board or cardboard sandwich when flipping a large design. Cover the second side and fuse it.
- Cool completely under even weight. Sandwich the project between clean sheets, keep it flat, and weight the whole design—not only the center—until the plastic is cool and rigid.
Start with a pattern sized to the pegboards you own. BeadForge makes a board-by-board blueprint, exact color counts, and an interactive Craft Mode so the placement work is finished before the iron comes out.
Open the free pattern generatorChoose your melt level before you start
“Done” depends partly on the finish you want. Decide before fusing the first side because you can always add a little heat, but you cannot restore a closed hole or an over-flattened bead.
Most pixel detail
Light fuse
Edges barely join and holes remain large. Crisp-looking, but easier to crack if the bond is incomplete.
Balanced finish
Standard fuse
Neighboring edges form a continuous bond while center holes remain visible. A practical target for most projects.
Flatter surface
Full melt
Holes mostly close and the surface flattens. Often strong, but heat control becomes less forgiving.
For a display piece, a useful compromise is a stronger melt on the back and a lighter, cleaner display side. Perler specifically recommends fusing both sides and notes that the “wrong” side can be fused more thoroughly when appearance matters.
How to prevent warping and curling
Warping is a heat-and-cooling imbalance. The ironed surface contracts as it cools; if one area or one side changes temperature much faster than the rest, the piece can pull into a curve. Large rectangles and full melts make small inconsistencies more visible.
- Heat the center, edges, and corners with the same overlapping motion.
- Avoid repeatedly spot-heating one stubborn color without blending the pass into nearby beads.
- Do not peel, lift, or bend the design while it is soft.
- Fuse the second side before the project has spent a long time cooling in a curved shape.
- Use clean paper on both sides during cooling so the weight cannot mark warm plastic.
- Choose a weight broad enough to cover the entire project and leave it until the center is fully cool.
Can a warped fuse bead piece be flattened?
A mild curl can often be improved. Place the piece between clean ironing paper on a flat heat-safe surface, warm the convex side with a brief moving pass, then immediately sandwich and weight it flat until fully cool. Start with less heat than the original fuse. Severe overmelting, stretched holes, scorched plastic, or a sharply creased design may not be reversible.
Warp rescue order
First let the piece cool completely so you can see the true curve. Support it between clean paper, warm the convex side for only three to five moving seconds, then place broad even weight over the entire piece. Leave it untouched until the center is cool. Repeat once at most before deciding that more heat would cause greater damage.
Ironing paper, parchment paper, wax paper, and substitutes
| Barrier | Use it? | Why |
|---|---|---|
| Manufacturer ironing paper | Yes—preferred | Designed for fuse beads and gives a known heat barrier between the iron and plastic. |
| Uncoated baking parchment | Common substitute | Heat-resistant parchment is widely used, but test the exact sheet because coatings and thickness vary. |
| Reusable PTFE craft sheet | Only if rated and tested | Can produce a different surface sheen and transfer heat differently. Follow its temperature rating. |
| Wax paper | No | Wax can soften, transfer, smoke, and stick to the project under ironing heat. |
| Bare iron | Never | Direct contact can ruin the soleplate, smear plastic, flatten the design, and damage the pegboard. |
| Towel or fabric over the beads | Not recommended | Thickness, weave, moisture, and movement make the heat transfer hard to inspect and control. |
If paper sticks, stop pulling. Let the surface cool briefly and peel slowly from one corner. Beads that lift are telling you their side bond is weak or the piece is still too soft. Lower the paper, restore any displaced beads, and use a short moving pass over that area.
Fuse bead troubleshooting chart
| Problem | Likely cause | Best next move |
|---|---|---|
| Beads fall apart after cooling | Too little heat, missed edges, or only a few contact points joined | Re-cover and spot-fuse weak seams; reinforce the back while preserving the display side. |
| Some beads melt while others stay tall | Uneven motion or pressure, creased paper, mixed brands, specialty finishes, or pigment differences | Use a lower setting and slower overlapping passes; test troublesome colors together first. |
| Holes close immediately | Iron is too hot, held still, or pressed too hard | Stop, lower the temperature, and shorten the next pass. Closed holes cannot be reopened. |
| Edges curl upward | Edges received different heat or the piece cooled without full support | Warm gently between paper and cool under a broad weight that reaches every edge. |
| Center bows upward | Center retained heat or the cooling weight was too small | Rewarm evenly and cool beneath a flat board or book larger than the whole design. |
| Paper sticks or tears | Wrong paper, excessive heat, or peeling while plastic is soft | Let it stabilize, peel slowly, and switch to clean ironing paper or tested parchment. |
| Pegboard bends or pegs flatten | Iron touched exposed board or too much heat traveled through the beads | Stop using the damaged board; lower heat and consider the tape method for future large work. |
| Piece snaps along one row | A cold stripe formed between passes or between pegboards | Reinforce the back across the entire seam with overlapping heat, then cool flat. |
How to iron a large multi-board project
A large project magnifies every variable: more pegboard seams, a longer heat cycle, more opportunities to lose alignment, and a bigger surface that can cool unevenly. Build and fuse it on a heat-safe work area rather than carrying loose connected boards across the room.
Perler’s official tape method secures the bead tops with overlapping strips of standard masking tape, sandwiches the pattern between large cardboard sheets, flips it, removes the pegboards, and then fuses one section at a time through ironing paper. Removing the boards before heating reduces the chance of melting pegs and can help avoid visible board seams.
- Overlap tape strips consistently and press them onto every bead before flipping.
- Use two rigid sheets larger than the artwork and a second person for an oversized flip.
- Work in repeatable sections with overlapping heat instead of racing across the entire surface.
- Inspect and spot-fuse side one, weight it while cooling, remove tape, then fuse side two.
- Prepare a cooling board and sufficient flat weight before the project is hot.
Mini bead warning
Perler states that its tape method is not suitable for Mini Beads. Follow the instructions for the exact bead size and product you are using rather than shrinking a 5 mm workflow and assuming it behaves the same way.
Should different bead brands be ironed together?
Perler, Hama, Artkal, and Nabbi 5 mm beads may fit similar boards, but fit does not guarantee identical plastic height, softness, pigment behavior, or melt rate. A mixed-brand design can develop low spots and weak seams even when its digital colors look perfect. Make a test strip containing every brand and specialty finish you plan to combine, then fuse it using the same paper and iron as the final project.
BeadForge keeps its brand palettes separate for this reason. Use the Perler color chart guide to plan codes and the brand comparison before substituting physical beads. Similar RGB values describe screen color—not melt compatibility.
Plan the project before the iron gets hot
Fusing cannot rescue a pattern that is too small for its subject or spread across boards without a usable layout. Decide the final dimensions, crop, palette, background, and board seams first. The pegboard size guide explains 29×29 board math, while the printable pattern guide covers labeled board pages and material lists.
Sources and testing standard
This guide uses current published instructions from the Perler FAQ, Perler’s official large-project tape method, and Hama’s ironing instructions. Manufacturer packaging for your exact beads and iron always takes priority. BeadForge is independent and is not affiliated with or endorsed by any bead brand.
Frequently asked questions
What temperature should I use to iron Perler beads?
Start with a medium setting on a dry household iron and turn steam off. Iron thermostats vary, so make a small test patch first and adjust one step at a time. If holes close almost immediately, lower the heat; if the bead edges never join, raise it slightly.
How long should I iron Perler beads?
Use short, controlled passes and inspect the bond instead of trusting one exact time. For 5 mm beads, 10 to 20 seconds per area is a useful first checkpoint on many projects, but iron size, temperature, project size, pressure, bead color, and desired melt all change the result.
Should steam be on or off when ironing fuse beads?
Steam should be off. Perler recommends a dry iron. Water and steam do not help the plastic fuse, and a dry setup gives you more predictable heat and pressure.
Can I use parchment paper for Perler beads?
Heat-resistant baking parchment is a commonly used barrier, while the manufacturer-supplied ironing paper is the safest known option. Do not use wax paper: its coating can melt and stick. Never put the iron directly on beads or a plastic pegboard.
Do you iron both sides of Perler beads?
Perler recommends fusing both sides for a secure bond. Many makers fuse the back more fully for strength and use a lighter pass on the display side to preserve open holes and cleaner pixel detail.
How do I stop Perler beads from warping or curling?
Keep the heat even, let the design become stable before moving it, and cool the finished piece completely between clean paper on a flat surface under a broad, even weight such as a heavy book. Uneven heating and unweighted cooling are common causes of curl.
Can I re-iron Perler beads that are not sticking?
Usually, yes. Put the piece back on a flat heat-safe surface, cover it with clean ironing paper, and spot-fuse the weak section with a short pass. Let it cool flat under weight again. Reheating cannot reopen bead holes that were already melted shut.
Why are my Perler beads melting unevenly?
Common causes include a creased sheet, a soft or uneven work surface, stopping the iron in one spot, inconsistent pressure, missing the edges, mixed bead brands, or colors that soften at slightly different rates. A test patch and overlapping moving passes reduce those variables.
Why is the ironing paper sticking to my beads?
The design may still be too hot, the heat may be excessive, or the paper may be unsuitable. Let it cool briefly and peel slowly from one corner. If beads lift with the sheet, lower it, replace them if necessary, and fuse that area again through proper ironing paper.
What is a full melt on Perler beads?
A full melt uses enough heat and time to close most or all center holes and create a flatter surface. It can make a strong piece but removes some pixel texture. A standard fuse joins the bead edges while leaving the center holes visible.
How should I iron a large multi-board Perler project?
Work methodically in overlapping sections or use Perler’s tape method to move the design off the pegboards before fusing. The official tape method is intended for larger standard-bead projects and is not recommended for Mini Beads.
Can I use a hair straightener, heat press, or oven instead of an iron?
A dry household iron with ironing paper is the documented method for ordinary pegboard patterns. Other tools concentrate or surround the piece with heat differently and can quickly overmelt beads or damage boards. Follow the bead manufacturer’s instructions for any alternative craft rather than treating it as an equivalent swap.
How long should fuse beads cool under a book?
Leave the piece weighted until it is completely cool and rigid, not merely cool on the exposed edge. Small projects may settle within several minutes; large, heavily fused pieces retain heat longer. There is no downside to giving a large piece extra cooling time.
Ready to make your own pattern?
BeadForge turns any image into a printable fuse bead pattern with bead counts and pegboard sizing — free, in your browser, no signup.