Beginner patterns
Small Perler Bead Patterns: 5 Easy One-Board Designs
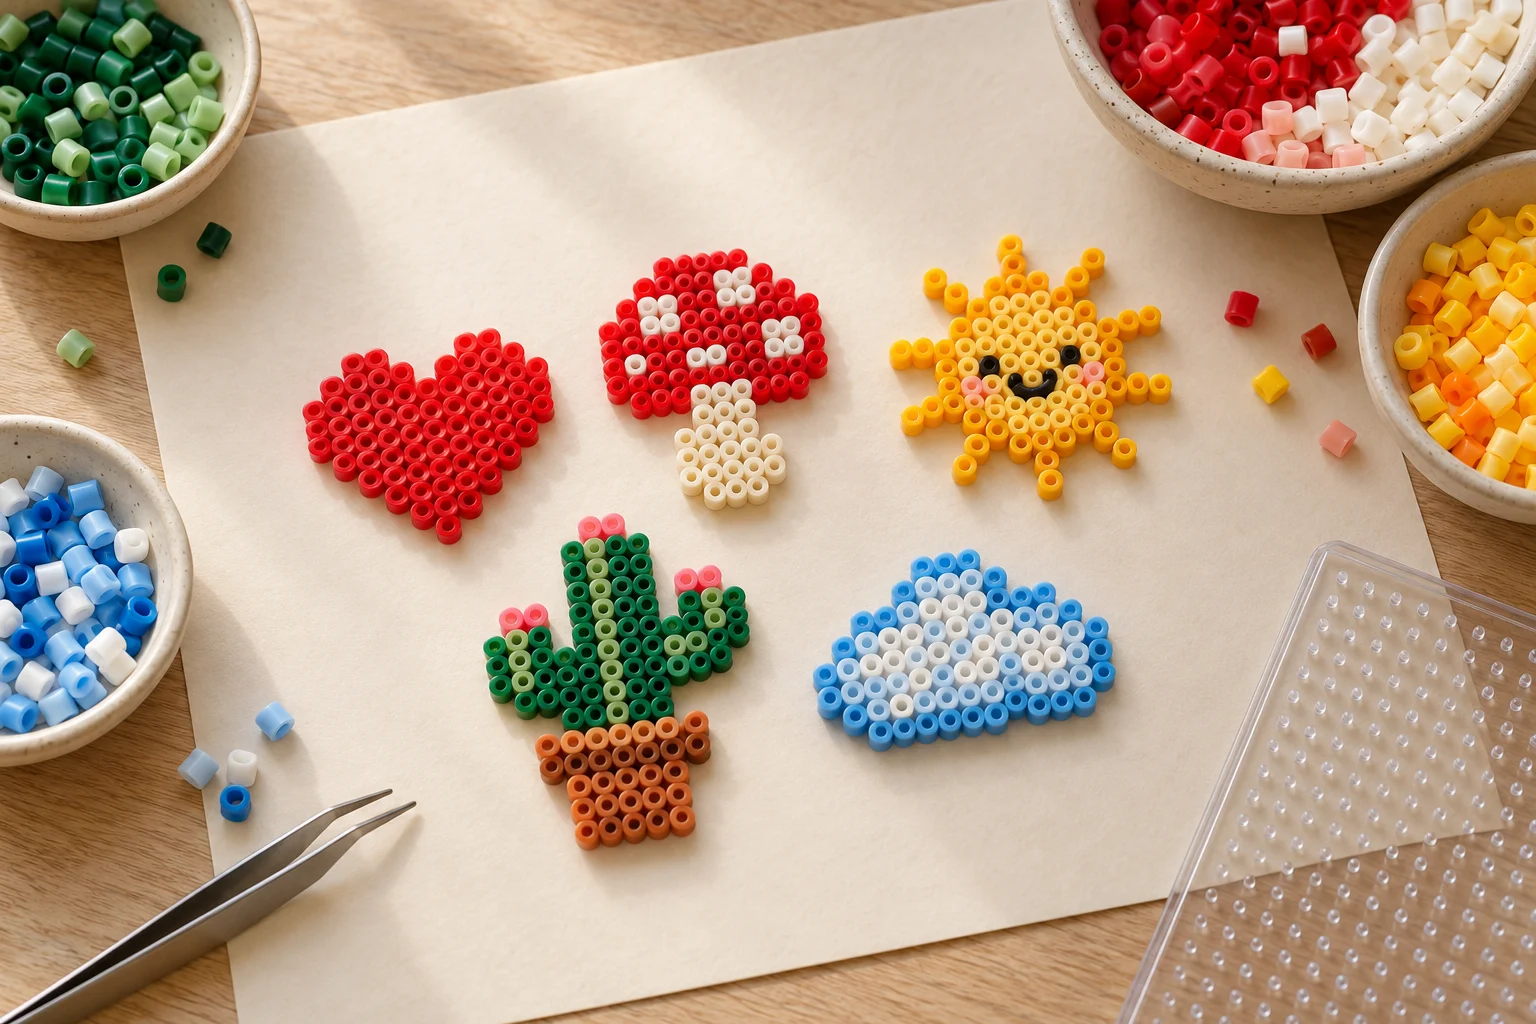
Five original small patterns, exact bead counts, and free printable grids for your next one-board project.
You don't need a wall of pegboards or a hundred bead colors to make something fun. These five small fuse bead patterns each fit inside a single common 29×29 square pegboard and use one to three colors. Start with the heart, try a tiny mushroom, or make a little sun, cactus, or cloud.
Each design below includes an exact grid and bead count. Download the free five-page pattern pack, or use the grids as a starting point for your own design in BeadForge Studio.
Download all five printable pattern grids
Open the free bead pattern Studio — no account is required to start. Create a free account when you want cloud saves and sharing.
Pick your first small pattern
| Pattern | Design area | Beads | Colors | Good place to start |
|---|---|---|---|---|
| Red heart | 8×6 | 32 | 1 | First project or color swap |
| Tiny mushroom | 10×8 | 52 | 3 | Practicing a few accent beads |
| Little sun | 9×9 | 33 | 2 | A simple face and straight rays |
| Potted cactus | 10×9 | 36 | 2 | Building a silhouette row by row |
| Blue cloud | 11×6 | 46 | 1 | A small shape with curved-looking edges |
The five patterns use 199 beads total if you build each once. That is the number of occupied cells, not the capacity of the board. A common 29×29 board has 841 possible positions, and most will stay empty for these designs. Board models vary, so count yours first. See the pegboard size guide for larger layouts.
What you need
- One square pegboard with room for an 11×9 design area; the supplied pages show common 29×29 boards.
- Matching fuse beads and a compatible pegboard. These are midi-style pattern layouts; use one compatible bead type throughout each piece.
- A small tray for sorting and optional tweezers.
- The exact grid on your phone or the printable reference page.
- Manufacturer-approved ironing paper and an iron for the finishing stage, handled by an adult.
If you're making all five in the colors shown, set aside 66 red, 4 cream, 14 tan, 31 yellow, 2 black, 22 green, 14 terracotta, and 46 light blue beads. Keep a few extra for dropped beads. These are descriptive colors, not guaranteed manufacturer color-code matches.
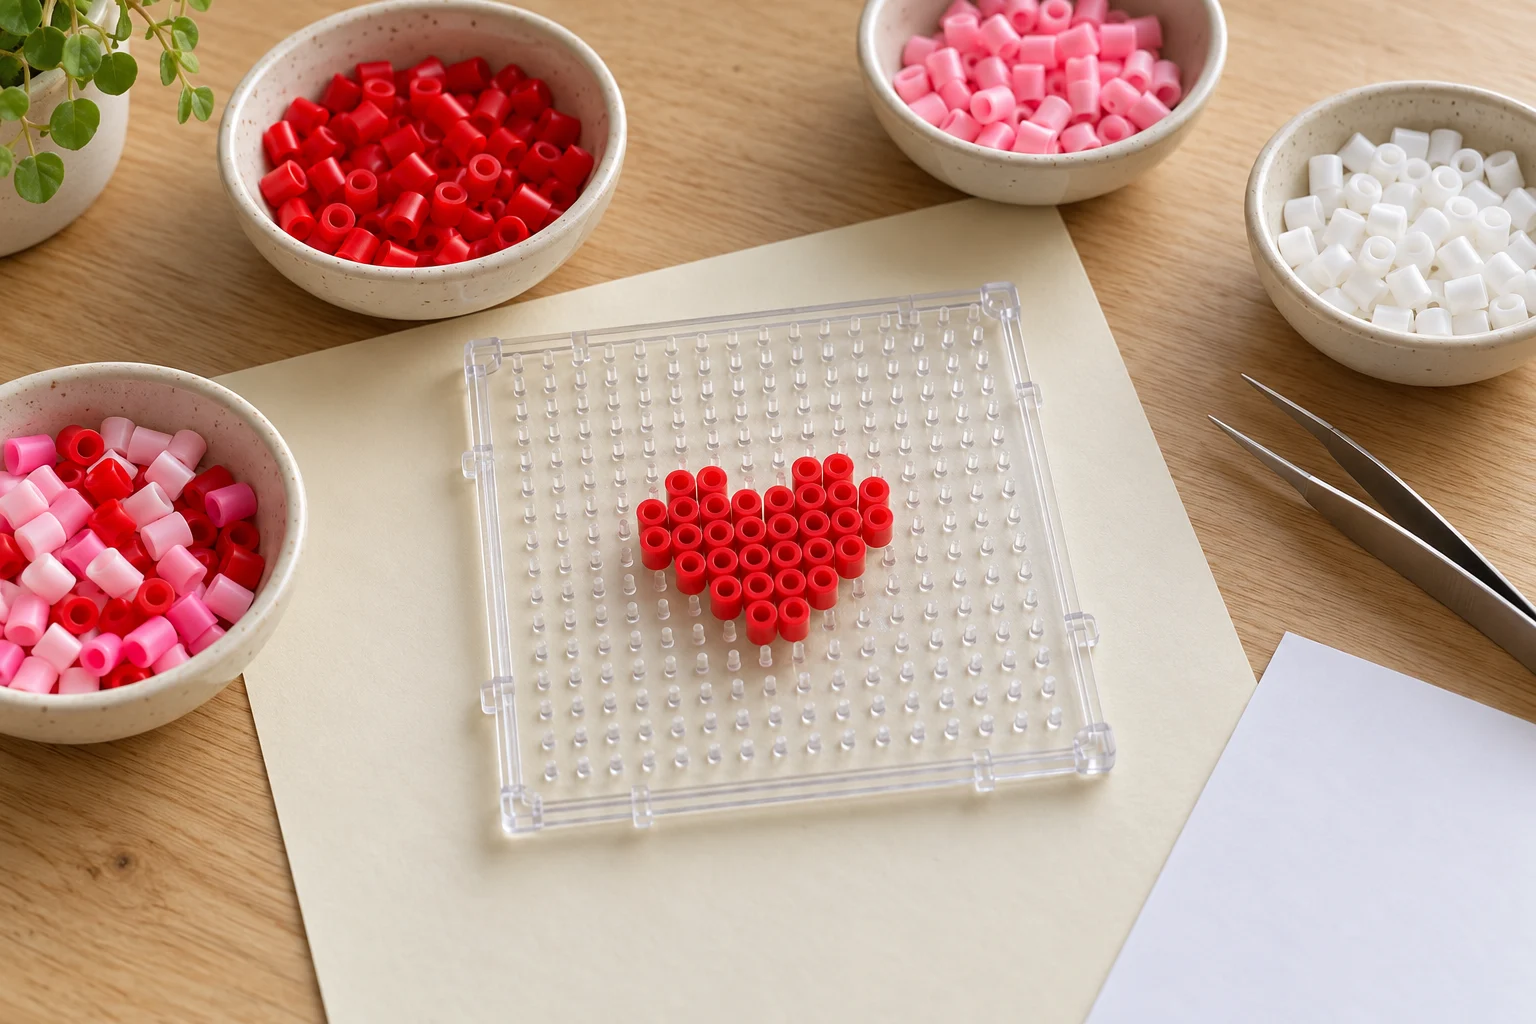
AI-generated workspace illustration; follow the exact heart grid below for this tutorial's 32-bead version.
How to read these patterns
Each colored circle means one bead. Empty grid cells stay empty. The diagrams show the designs centered on a 29×29 reference board; the tiny artwork itself does not fill the board.
Use the numbered rows and columns to keep your place. Build from top to bottom, checking one row before moving to the next. The PDF is a visual reference, not a life-size underlay: printer scaling and peg spacing vary, so do not expect its dots to line up under your physical board.
These original designs have been checked digitally for counts, dimensions, and edge-connected bead placement. They have not yet been physically built or fuse-tested. Narrow connections may need extra care or a wider redesign if you want a piece that will be handled often.
1. A small red heart: 32 beads
The heart uses one color, which makes it a straightforward first pattern. Keep both upper lobes in place and check that the bottom point sits between them.
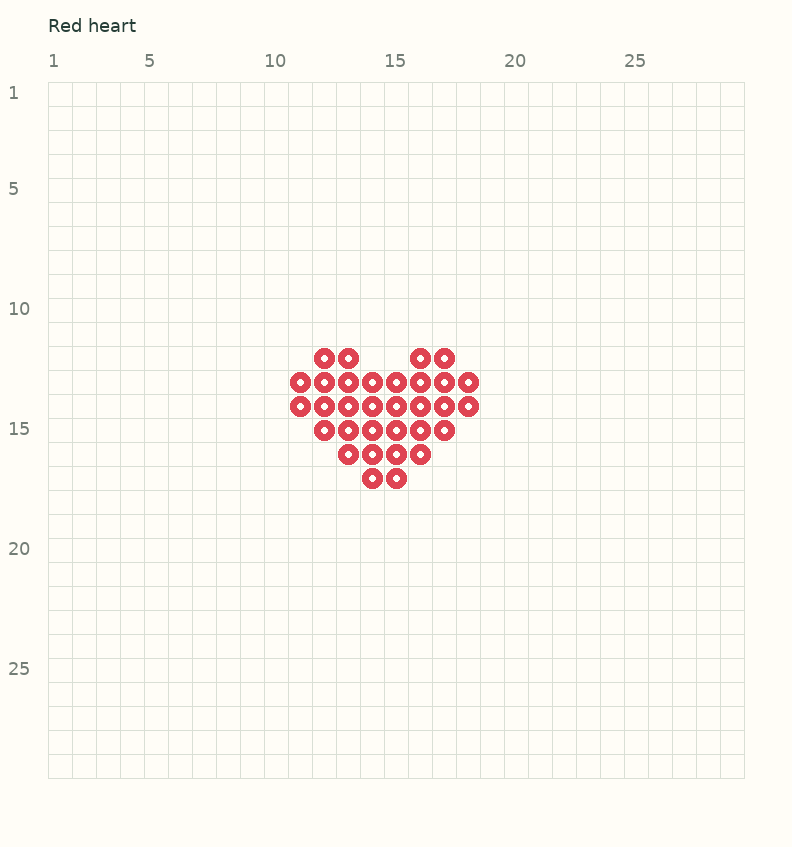
Design area: 8 columns × 6 rows. Materials: 32 red beads.
Try pink, purple, or two contrasting halves once you have followed the original. Changing a color does not require changing the outline.
2. A tiny mushroom: 52 beads
Build the cap first, checking the four cream accent beads against the grid, then add the tan stem. The cap provides a wider area to practice row counting before the narrower stem.
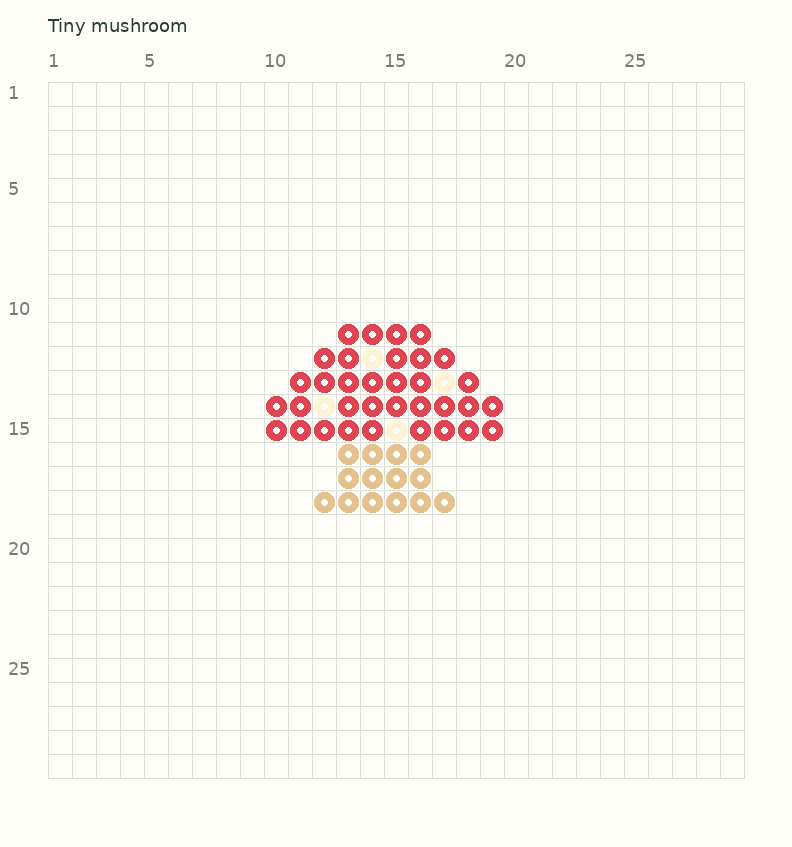
Design area: 10 columns × 8 rows. Materials: 34 red, 4 cream, and 14 tan beads.
The spots are optional color choices; keep a bead in each spot position even if you change its color. Leaving those cells empty changes the pattern.
3. A little sun: 33 beads
This version uses a yellow center, two black eyes, and four short rays. Place the center before the rays so the narrow sections stay easy to check.
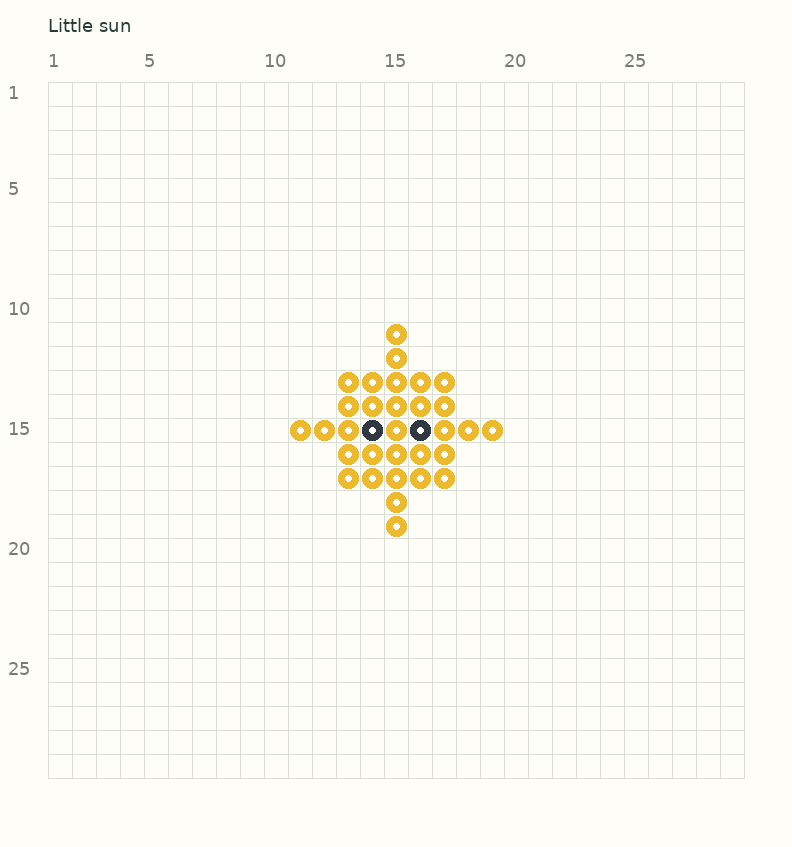
Design area: 9 columns × 9 rows. Materials: 31 yellow and 2 black beads.
The photo above is an illustration with more detail; this smaller grid is deliberately simpler. Prefer a sturdier silhouette? Redraw it as a wider sun in Studio and check the updated counts before building.
4. A potted cactus: 36 beads
Place the green trunk, then work outward through the arms, finishing with the terracotta pot. Keep the horizontal joining row filled so the arms connect to the trunk.
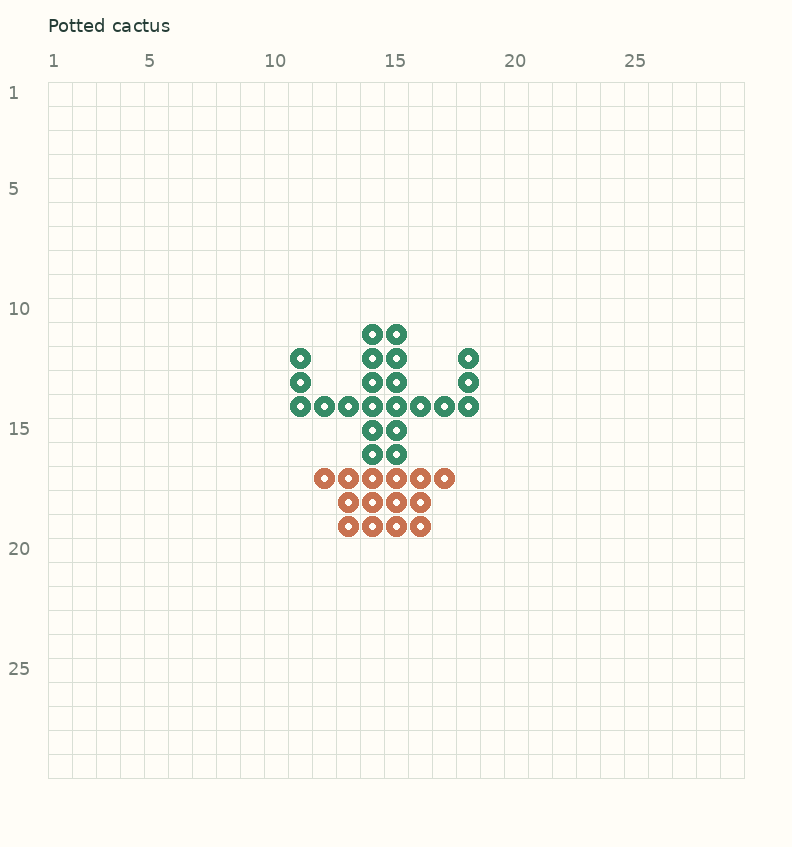
Design area: 10 columns × 9 rows. Materials: 22 green and 14 terracotta beads.
Swap the pot color to match a room or change a few green beads to a lighter shade. If you add flowers, place them against existing beads rather than leaving them floating outside the design.
5. A blue cloud: 46 beads
The cloud uses a single color and stepped edges to suggest a soft outline. Follow the row widths carefully rather than trying to round the shape by eye.
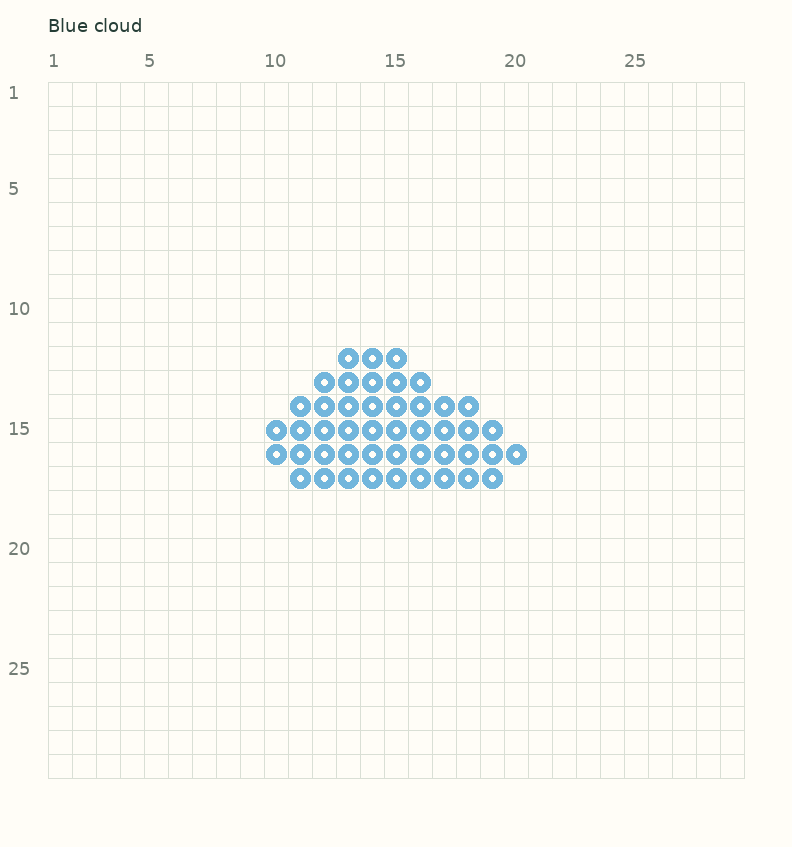
Design area: 11 columns × 6 rows. Materials: 46 light blue beads.
White, lavender, or pale gray also work as personal color choices. Check your screen against the beads you own before deciding on a shade.
Make the next version your own
Open BeadForge Studio, choose a classic board, and draw one of these small outlines. Change the colors, widen a narrow connection, or add a detail before exporting your version. The included tiny source PNGs also preserve the artwork one pixel per bead for reference; don't upscale or smooth them before a pixel-based conversion.
If you start with a drawing or photo instead, use the free image-to-bead pattern generator. Begin with a bold subject and compare the preview at one board before adding more. A detailed face generally needs more room than a small symbol; the photo-to-pattern guide walks through that decision.
For original pixel drawings, the bead sprite guide explains the relationship between image pixels and bead positions.
Finish carefully and keep your pattern
Follow the instructions for your actual beads, board, and ironing paper. Have an adult handle the iron, keep it away from loose beads, and let the piece cool before handling it. There is no single temperature or time that works for every iron and bead type. Our guide to ironing without warping covers the process in more detail.
Keep the reference page or export so you can repeat the design later. For larger custom projects, the printable-pattern guide explains board-by-board planning.
Common questions
What is an easy Perler bead pattern for a beginner?
A small design with one or two colors and a clear outline is a practical starting point. The 32-bead heart and 46-bead cloud in this guide each use one color, so you can focus on matching the grid.
Can I fit these patterns on one pegboard?
Yes, each fits inside a common 29×29 square board. The largest design width is 11 beads and the largest height is 9. Check the usable grid on other board shapes and models first.
Do I need to fill all 841 pegs?
No. Leave the empty areas empty. Each pattern lists only the beads actually placed, from 32 to 52 beads per design.
Are the printable patterns free?
Yes. The five reference grids are included in the free download. BeadForge also offers free browser-based creation without an account; optional free accounts add saving and community features.
Can I use Hama or Artkal beads instead?
The grid describes placement rather than a brand-specific formula. Use beads and a board that physically match, and follow that manufacturer's fusing instructions. Don't assume different brands, sizes, or formulations will fuse identically.
Ready to make a version in your favorite colors? Open BeadForge Studio.
BeadForge is an independent tool by Eleven North and is not affiliated with Perler, Hama, Artkal, or Nabbi.
Ready to make your own pattern?
BeadForge turns any image into a printable fuse bead pattern with bead counts and pegboard sizing — free, in your browser, no signup.